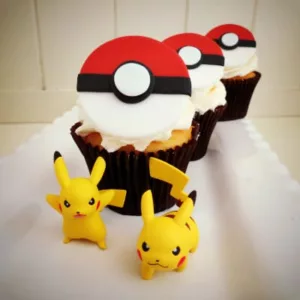
How to make gum paste strawberries

Posted on June 26th, 2009 in Cake Tips, Tutorials

Strawberry 1

I got so many request on how I made the gum paste strawberries for my Cath Kidston cake. So here it is :-) Use the gum paste strawberries as decoration on cakes and cupcakes.

This is what I use:
Gum paste: White, red, pink and leaf green
Pink non-pareils
Non-stick board
Rolling pin
Tylo glue
Corn starch
Small paint brush
Dresden tool (JEM) or another pointy tool
Ball tool
Frill stick
Flower foam mat
Small 5 petal blossom cutter
Medium daisy or 6 petal flower cutter
Strawberry Leaves & Calyxes/Set of 4 (JEM)(I did not use the calyxes for the strawberries)
Multi leaf silicone veiner
Small plastic palette

Strawberry flower
Step 1:
Start with the white small flowers. Roll out the white gum paste thinly and cut out flowers with the 5 petal blossom cutter. Place the flowers on the flower foam mat and thin the petals slightly by carefully pressing down the ball tool on every petal. Transfer the flowers to the plastic palette to dry.

Strawberry 2

Step 2:
When dry, brush a little tylo glue in the middel of the flowers and sprinkle a little pink non-pareils in the center. Set aside and let dry.

Strawberry 3

Strawberry
Step 1:
Roll out the leaf green gum paste thinly and cut out leaves with the strawberry leaf cutter. If you are having trouble getting the leaf out of the cutter, then use a toothpick to release it.
Place the leaves in the multi leaf silicon veiner and pres to get veins on the leaves. Arrange the leaves so that they do not dry all flat and let them dry.

Note: you can also wait with this step and make the leaves on the day you are decorating your cake or cupcakes.

Strawberry 4_edited-1

Step 2:
To make the strawberries take some red or pink gum paste in the desired size and roll it into a ball. Make sure that there are no cracks in the ball at this stage!!. Model it into a strawberry shape.

Strawberry 5

Step 3:
Take the pointy end of the dresden tool and make indentations like on a real strawberry.

Strawberry 6

Step 4:
Roll out some leaf green gum paste and cut out a daisy / 6 petal flower cutter. Flatten the petals with the frill stick and glue it on the the top of the strawberry. Make a indentation with the frill stick and brush with a little glue in the hole. Take a small piece of leaf green gum paste and roll it into a little sausage to use as a stem and put it into the hole. Let the whole strawberry dry.

Strawberry 7

Happy Caking

Louise

Rosey fondant cookie lollys

Posted on June 21st, 2009 in Cake Lounge

img_fondant-cookie-lolly-3

Back when I saw some cute cupcake fondant molds I was thinking of how they maybe could work as a cookie decoration. The mould is very easy to work with and it release the fondant without a fuss as long as you remember to dust it well with corn starch ;-) I quickly found out not to use too much fondant or the disc would be too thick and too sugary sweet to bite into. So I tried my best to make the disc as thin as I could without ruining the pretty roses. With these lolly’s they did get a little too thick I think.

I glued them on to the cookies with piping gel wich worked out great. Dusted the roses with pink and green lustre dusts and completed them with a piped border of royal icing dots. They look very sweet and Shabby Chic I think.

Happy Caking

Louise

Topsy Turvy DVD

Posted on June 17th, 2009 in Cake News

topsyturvydvd_edited-2I am a big fan of Sharon from SugarEd Productions and her fantastic dvd’s. Especially the previous one Boxes & Bows wich was filled with so many tips and tricks. Well Sharon is not lazy as she is out with a brand new dvd for all of her SugarEd fans.

This time it is all about the popular Topsy Turvy cakes. There are several ways this cake is made and I like Sharons and the Australian style (Madhatter) the best. So I have just placed my order for her new Topsy Turvy dvd and I cant wait to hold the dvd in my hands…..


Happy Caking

Louise

CakeJournal Updates

Posted on June 15th, 2009 in Cake Lounge

My new blog design made by the lovely Gisele Jacquenod is being installed. So there may be some minor adjustments and things not looking right at the moment. Hopefully it wont take long……

Happy Caking

Louise

Petit Fours

Posted on June 3rd, 2009 in Cake Lounge, Tutorials

img_petit-four-blue

I have for a long time wanted to try out some Petit Fours from Martha Stewart made with pound cake and Petit Four icing. So yesterday I went into the kitchen to bake a basic vanilla pound cake (I used another pound cake recipe than the one from MS). I wanted to try out the Petit Four icing from MS but since I did not have any light corn syrup in the house, I decided to try out a package of instant fondant icing mix to see how that is to work with. To get the small Petit Fours I used the trick cutting the pound cake into 1″ thick slices and with a round circle cutter you cut out the small cakes.

img_petit-four-poundcake

Then you place the small cakes on a wire rack with a baking tray underneath to collect any leftover icing. I had my mixed instant fondant icing heated and ready. Use a ladle to pour the icing over the small cakes in a circular movement. Here it is important that you quickly pour enough icing over the cakes because you want to seal the cakes completely with the icing. If the icing is too thick at this stage you will have problems with it harden before it have covered the small cakes all the way to the bottom.

img_petit-four-pf

I must say that the instant fondant icing mix was ok to work with but I still want to try out the Petit Four icing recipe on MS because it just looks soo smooth and pourable. When the Petit Fours are all done with the icing, you can cut them loose by using a small sharp knife and with slightly wet fingers transfer them to cupcake paper cases. Now your Petit Fours are ready to be decorated. I used some gum paste Hydrangea and some Primrose flowers for my Petit Fours.

img_pink-petit-fours-11

Store your Petit Fours in a card board box that is not completely airthight or the icing can get sticky. The refrigerator will melt the icing.

Happy baking

Louise

How to make a knitting basket cake

Posted on May 24th, 2009 in Cake Lounge, Tutorials

basket-1

Two years ago I made a 3D knitting basket cake. I got so many great comments on it and the cake was featured on a lot of knitting blogs :-) Last year I then got a request on making a tutorial on it for Desserts Magazines. But now I want to share it here aswell. It is a really fun cake to make and if you know or have a family member who just loves to knit, this cake will be a hit.

You can make the basket in almost any shape but I like round, oval and square the best. Use a nice, firm and moist cake of your favourite choice and you will also need to bake 1 x 6″ round cake to make the balls of yarn.

This is what I use:
1 x cake in either shape: Round, oval and square.
1 x 6″ round cake
Cake board
Buttercream or chocolate ganache
Sugar syrup
Serrated knife
Small knife
Angle spatular
Rolling pin
Basket weave embosser from Patchwork Cutters or a basket weave textured rolling pin.
Sugar craft gun with medium round disc
2 small paint brushes
White fat (Crisco)
Silver edible liquid color
Clear alcohol
2 wooden BBQ sticks
Cornstarch
Brown food gel color
White rolled fondant icing
3 gel food colors of your choice for the ball of yarns
Cornstarch dusting bag
Block of styrofoam
Tylo glue

Knitting needles:
Start by rolling 2 small fondant balls and glue them to the end of the BBQ sticks. Set aside and let it dry. Paint both BBQ sticks with silver edible liquid color and place them in the block of styrofoam and set a side.

billede-1

Ball of yarn, step 1:
Trim of the top of the 6″ round cake and place it in a bowl and break it down with a fork (a foodprocessor can be used instead) add 2 tbsp of buttercream or chocolate ganache to start with and mix the cake mixture until it can be rolled into balls. Make sure that they can fit into the basket cake. Place the cake balls on a plate and put them in the refrigerator to get firm.

img_4469

Ball of yarn, step 2:
Color some of the fondant in the colors you like and take out the cake balls. Start with 1 cake ball at a time and brush it lightly with sugar syrup. Now roll out some fondant and cover the cake ball. You dont need to get it all smooth because you will add strings of fondant afterwards. Continue with the last 2 cake balls.

To make it more easy to push the fondant through the sugarcraft gun, knead in a little white fat and drops of water. load the sugarcraft gun with fondant and use the medium round disc. Push out long strings of fondant and lay them close together like shown on the photo.

billede-8

Ball of yarn, step 3:
Brush glue on one of the ends and with a knife cut the strings like shown on the photo. Attache to the ball and repeat on the other end.
billede-9

Continue pushing out strings of fondant. Brush with glue on the ball and place them across on the ball. Do this twice, only now placing them the oposite way. Set aside and continue with the last two.

billede-10

img_4512

Remember to save some of the excess fondant for later to make extra strings.

Basket cake, step 1:
Give the cake a light crumb coat with bc or chocolate ganache and set it aside. Color some fondant light brown, roll it out and cut a “lid” in the same size as the cake by using the cake tin. Trim off any excess fondant if needed. Knead the light brown fondant and roll it out long enough to go around the cake. Take the basket weave embosser, dust it well with cornstarch and emboss the fondant in the same height as the cake. Cut it with a knife and roll up the fondant.

billede-2

billede-3

Basket cake, step 2:
Roll the embossed fondant around the cake. Trim off any excess fondant and remove any left over cornstarch with a dry brush.

billede-4

Basket cake, step 3:
Make a long robe out of the light brown fondant by rolling two long sausages and twist them. Cut the ends clean. Glue it on the top of the cake with tylo glue.

billede-6

Basket cake, step 4:
Mix brown food gel color with drops of clear alcohol on a plate and paint the whole basket cake. Set aside to dry.

billede-7

Assembling the cake:
To assemble the knitting basket cake, take the three “balls of yarn” and place them in the basket. Make more strings in the same colors as the “yarn” and place them randomly on top. Finish by placing the knitting needles in the basket (see top photo).

img_4523

img_4530

Happy Caking

Louise

CakeJournals favourites

Posted on May 21st, 2009 in Cake Tips

Now and then, on my daily surfing online, I find some really great sites and this one I am about to show is a real treat. I am talking about the blog The Frosted Cake ‘n Cookie. Not only is the blog design very sweet but the girl behind it, Julie, have thrown her heart at cupcake cake toppers. The things that she makes with fondant is so neat and tiny and I promise that it will turn even the most boring cupcake into a little haute couture creation. She puts an effort in making some fine tutorials just the way that we like it :-)

the-frosted-cake-n-cookie-2

Julie also write about other yummy stuff, like this delicious heart apple tart or this praline cupcake and it often comes with a recipe, wich makes it even better.

the-frosted-cake-n-cookie-21

So enjoy this sweet blog and lets go and make some cupcake toppers!

Happy Caking

Louise

The Cupcake Courier

Posted on May 18th, 2009 in Cake Tips, Cake Tools

img_cupcake-courier-best-friend

Do you know who is cupcakes best friend? It is the Cupcake Courier a wonderful and stylish little helper that allows you to carry 36….. yes 36 cupcakes all in one go. It have three stack and removeable cupcake trays. It will keep your cupcakes safe and preventing the frosting and decoration from getting squashed under transport. It is invented, designed and developed by Jennifer Gunn. A mother of two who needed a safely way to transport cupcakes to her children’s parties and school gatherings.

img_cupcake-courier-5_edited-1

This is a must have for everyone who loves to bake cupcakes!

So last week I went on a Cupcake Courier hunt and my first stop online was at the Cupcake Courier distributor in Australia. Keren the distributor told me about the UK distributor Vanessa. Quick sending a request to Vanessa, but due to the high shipping costs she only sell the Cupcake Courier in the UK…. boo woo! She then told me that I could get it from Squires Kitchen…….Yeahh!! My search was over and I went straight on to their site and ordered a Cupcake Courier.

(Squires Kitchen only have them in “sky blue” and “petal pink”)

So today my very own Cupcake Courier in petal pink arrived on my doorstep :-) and ohh it is soo beautiful. I know that I will cherish this forever. Of course you have to have in mind how tall your decorated cupcakes is so that you wont have any trouble with your decorations ;-) The green cupcakes with the blue Hydrangea is a bit to high to store in the lower trays. But the blue cupcake with the pink Petunia could just be there without getting smashed. I cant wait to try it with 36 cupcakes!

img_cupcakes

If you are located in Canada there even is a way for you to get your hands on a Cupcake Courier.

So what are you waiting for?

Happy Caking

Louise

Cupcake fondant moulds

Posted on May 13th, 2009 in Cake Lounge, Cake Tools

karen-davies-cc5-copy

I was lucky to meet Karen Davies last year at the Scandinavian Cake Show in Sweden where she was demonstrating her new silicone fondant moulds and on my regular browsing through my favourite sugarcraft supply sites, my eyes spotted the new and very sweet cupcake moulds from Karen Davies along with the tekst:

“Many cake decorators enjoy making and decorating cup cakes – the latest cake fashion. But – when the order comes in for 100 – you realize that’s a lot of baking, icing, and flower making etc. Our new moulds help you by doing several jobs in one go. By using our moulds, you have the decorated cup cake top in one easy action”.

I could not agree more :-) Sometimes it is ok to take the short cut ;-) and here you get both the fondant disc and top decoration all in one go, now that is easy! What I also like is that with small flowers, butterflies, shimmers, glitters, edible pearls ect you can make the cupcakes even more stylish and personal.

karen-davies-cupcakes-copy

I even think that the cupcake moulds could be used as a “quick” decoration on cookie lollys as well. So if you are looking for some sweet and adorable silicone moulds to make cupcake, cookie and cake decoration easy then please take a look at the moulds from Karen Davies.

Happy Caking

Louise

Note: The cupcakes on the photos is not made by me but made by Karen Davies Sugarcraft LTD.

How to make gum paste roses

Posted on May 4th, 2009 in Cake Tips, Tutorials

img_rose-3

I have received many requests on how I made the large pink gum paste roses on the Cath Kidston cake. The secret behind them is not me, but a fantastic cake designer named Fran McGregor. She have made the most wonderful rose tutorial. The way she guides you through the process is very clear and easy to understand. Well Fran were so kind to give me permisson to upload the rose tutorial on CakeJournal.

Unfortunately the video file was too large to upload on CJ and I even tried youtube with no luck. But do not worrie you will find the rose tutorial, via this flickr link here.

Note: You will have to scroll down and look for Frans (franjmc) comments to find it.

In the video is also listed all the equipments to make the rose, including the recipe for her fantastic modelling paste.

Good to know tips!
1. To make sure that the styrofoam egg will fit the JEM easy rose cutter. Bring along your cutter, so that you are buying the right size of styrofoam egg. Well at least with the two largest easy rose cutters 100mm and 110mm. For smaller roses use smaller easy rose cutters, rose petal cutters and make the cone out of gumpaste instead.

2. A block of styrofoam is great to place the wired rose cones in the start of the process. Later the roses need to hang upside down to dry through the process so make sure that you have either a broomstick or anything similar ready before you start on the roses (I just use my small drying rack for my roses).

3. The thin piece of foam that is used in the video is a great “helping hand” when attaching the rose petals.

4. I use the rose petal cutter set from TinkerTech Two wich is really nice and dont forget to use the tylo glue.

img_rose-close-up

If you want to see more fantastic roses and cakes please visit Fran’s own website it is such a beautiful sight.

You are of course also welcome to have a look at my “old” rose tutorial here on CJ.

Happy Caking

Louise

Related Posts with Thumbnails


Blog sponsors


Credits